Review: Cook Me Somethin' Mister! New Orleans Style Jambalaya Mix

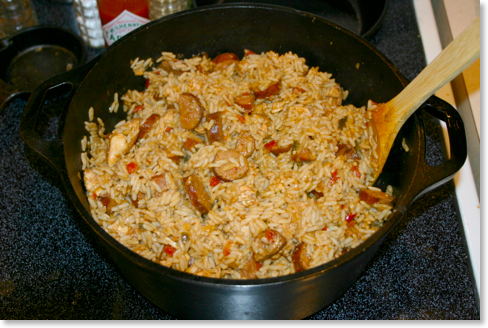
The directions suggest 1 1/2 lbs. of skinless chicken thighs and 1 1/2 lbs. of smoked sausage. Of course, if you're already familiar with jambalaya, you know that just about any meat or seafood combination can be substituted. In my case, I grilled some chicken breasts, which I chopped up afterwards, and substituted andouille sausage for the smoked sausage. The recipe also calls for "a five quart pot." I used a Lodge Logic 5 qt. Dutch oven
The directions, which are printed on the packaging, were simple enough. After the meat was cooked in the oil, I added water and brought the pot to a boil. While boiling, I added the mix and boiled this for 3 to 5 minutes. Then, it was just a matter of waiting. The stove's heat has to be completely turned off and the food sat covered in the dutch oven for 30 minutes. Although the next-to-last step suggests testing the rice to make certain it's done, it was for us. The only remaining step was number 8 requiring the cook to "Shout, 'Yum, yum, come get you some!'" which I did, bringing both Kathy and Bessie Mae (our hound dog) running. Unfortunately, Bessie Mae did not get any.

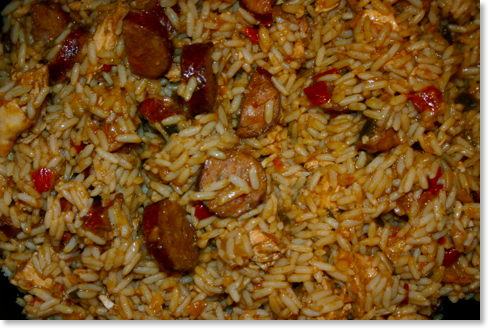
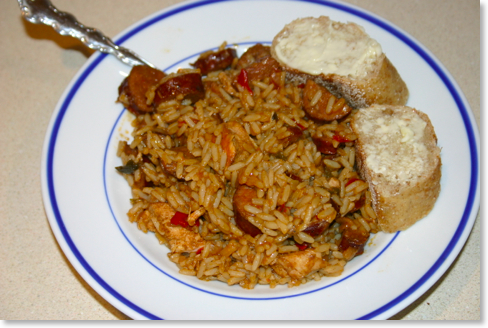
I've eaten and made many jambalaya recipes in my life and I have to admit that this one was right up there with the best of them. It's easy to be skeptical of a mix, but this one had the flavors right. Maybe part of it was Chef Paul Prudhomme's Magic Seasoning blended in--a fact advertized right on the label. I think another reason why it was so good is that unlike many mixes I've tried in the past, this particular one used vegetables large enough to see, bringing out a much richer flavor.

As you can see in the close up above, red and green bell peppers are easily identifiable as well as onions. The flavor was rich, and full, and my guess is that the average person would not even consider that it might be a mix.

The package advertizes that once chicken and sausage is added, there's enough food for 8-10 full meals. I would say, that and maybe more. We also gave some to some friends of ours without telling them it was from a mix so as to get an unbiased reaction. They thought it was wonderful and were actually surprised when I told them it was a mix.

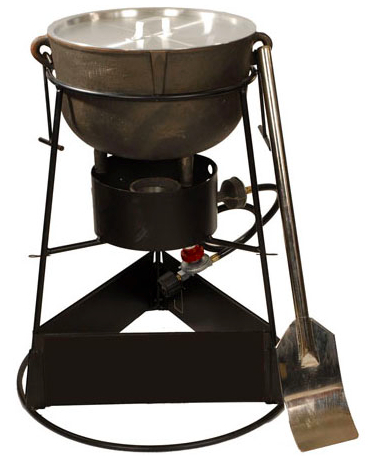
But there's even greater reason to use this mix in a whole different context. Cook Me Somethin' Mister also sells a 4 gallon or 8 gallon cast iron jambalaya pot and burner combo. The four gallon combo requires 10 lbs. of meat total and 4 bags of the jambalaya mix. The ten gallon setup uses 10 bags of the mix and 20 lbs. of meat. These will produce 32 and 80 servings respectively!
What would you use this for? Well for tailgating parties, campouts, and any other event where you might need to feed a whole lot of people. I think this would be great fun to cook this huge cast iron pot of jambalaya for a large group of friends.
The good news is that you don't have to fix multiple gallons of Cook Me Somethin' Mister New Orleans Style Jambalaya to try it. You can start with one bag which will be enough for your family, maybe a couple of friends, and who knows--you might even end up with leftovers!
Feel free to leave your thoughts or ask questions in the comments below, or you can contact Rick directly at rick@cookingincastiron.com.
Regarding the New FTC Guidelines Regarding Endorsements, Testimonials

I want to let the readers here know that I think it's a great idea. You should know up front when you're reading a review of a product, book, movie, or whatever, whether or not the reviewer has been compensated in some way--even if it's stimply a free sample or copy of the product under review.
We've only offerered a handful of these kinds of reviews in this site's short tenure, but we've stated up front, every time, when a product was given to us. Last year, a chicken fryer was given to us for review, and after we reviewed it, we gave it away. We've reviewed a couple of food products (one coming up in a day or two), and we always acknowledge this as well.
My belief is that you want to know what we think of particular products or you wouldn't come here. I don't want you to think that we're biased just because someone sends it to us, though. If it's a food product, obviously we can’t send that back. But if it's something more tangible such as a piece of cast iron, we will always either give it away or send it back afterwards. If that policy were to ever change, I'd let you know. But with the roughly 30 or so pieces of cast iron that I cook with, not one of them has been given to me by a commercial company.
I also promise that if there's ever a product that we really don't like, we'll simply tell it like it is. If it's a product that's been sent to us.... well, this is simply the risk that companies take with reviews. But we'll always be very polite, of course!
We're also open to suggestions. If you'd like to see a particular product reviewed, let us know. If it's within our budget or if we can get a review copy/sample/demo from the manufacturer, we'll be glad to give it a shot.
And if you're a company that would like to see a product reviewed here, contact me at the email address below, and we'll consider it.
Feel free to leave your thoughts or ask questions in the comments below, or you can contact Rick directly at rick@cookingincastiron.com.
Macaroni & Cheese in Cast Iron: All You Can Eat

I know I'm biased, but I really do believe that macaroni and cheese tastes better in cast iron. Most folks probably don't think about cooking dishes like this in cast iron, opting for a regular casserole dish or even a non-cast iron stove top pan if making the generic box mix from Kraft. If that's you, I have three suggestions: (1) Regardless of your recipe--whether from scratch or a mix--try it in cast iron. You will be very pleased with the texture that macaroni and cheese gets from cast iron. (2) I've yet to come across a really difficult macaroni and cheese recipes. I strongly urge you to make it from scratch rather than making it from a box. Having said that though, I realize that some folks simply like boxed macaroni and cheese. Therefore (3), if you insist on making macaroni and cheese from a box, at least try it out in cast iron--probably just a skillet--especially if you have a lid for your skillet. You will be very surprised with the results.
To test my assertion that macaroni and cheese always tastes better in cast iron, we made a number of different recipes--four to be exact--all cooked in cast iron. Some of these recipes are better than others. Since Kathy and I cooked them (and ate them!) together, she's going to add her comments. Unless you see Kathy's name next to the paragraph, assume that it's me--Rick--writing.
Supposedly, macaroni and cheese goes back to early 19th century when Thomas Jefferson served it to guests. Whether that's true or not, I don't know. What I do know is that it doesn't begin to popularly appear in cookbooks until the middle of the 20th century. Therefore in an attempt to get back to the foundations of macaroni and cheese, we started with a recipe from the original 1953 Better Homes and Garden New Cook Book
Macaroni and Cheese
1953 Better Homes and Garden New Cook Book

The recipe also calls for 2 cups of American cheese. I can't find American cheese in grocery stores these days; I can only find cheddar. I assume that I could find a block of American cheese at a specialty store, but I simply used cheddar in this recipe instead.
We used a Lodge two-quart serving pot with iron cover
Of the four macaroni and cheese dishes we made, this was the most basic and my least favorite. It's not that it was bad. Not at all. It just simply didn't stand out compared to the other three.
Kathy's comments: Although this macaroni and cheese dish was good (I can't imagine one that isn't!), it was not my favorite. The minced onions just didn't belong. I love onions, but somehow they didn't fit with this recipe. If we made this dish again, I'd try sauteed sweet onions.
Cast Iron Required:
- Two quart cast iron serving pot
- 1 6 oz. package 7-minute macaroni, (or 1 7 oz. package elbow macaroni)
- 2 cups American cheese, cubed
- 1 1/4 cups milk
- 2 tablespoons minced onion
- 1/2 teaspoon salt
- pepper
- paprika
Cook 7-minute macaroni according to directions on package. Mix with cheese, milk, onion, and salt and pepper; turn into creased two quart cast iron pot (original: 1 1/2 quart casserole). Sprinkle with paprika.
Bake mixture in moderate oven [350°] 45 minutes. Makes 6 servings.

Macaroni 'n' Cheese
1953 Better Homes and Garden New Cook Book

I used the same Lodge cast iron serving pot for this recipe as the previous one. I really liked the flavor of this version of macaroni and cheese. The onions and cream of mushroom soup give it a good flavor. It's also the only macaroni and cheese we made that was layered. It looks really nice in the serving pot once it's dipped into, and it looks simply sinful on the plate. I liked this recipe quite a bit and would like to try it again. Kathy did not care for it as much.
Kathy's comments: Of the four macaroni and cheese recipes we tried, this was my least favorite. Once again, I didn't think the onions quite belonged. Since this was the second recipe to have them as an ingredient, I assume I am simply biased against onions in my mac and cheese. I also didn't like the cream of mushroom soup. It turned this side dish into more of a casserole in its taste and feel. Don't get me wrong, I still ate plenty of it, though!
Cast Iron Required:
- Two quart serving pot
- 1 6 oz. package 7-minute macaroni
- 1 10 1/2 or 11 oz. can condensed cream of mushroom soup
- 1/2 cup milk
- 1 teaspoon grated onions
- 1/2 teaspoon salt
- dash pepper
- 1/2 pound American cheese, cubed
Cook macaroni in boiling, salted water; drain and rinse.
Combine the mushroom soup, milk, onion, and seasonings.
Alternate layers of macaroni, soup, and cheese in creased 2 quart cast iron pot (original: 1 1/2-quart baking dish). Bake in moderate oven [350°] about 45 minutes. Makes 6 servings.

Kathy's Jalapeño Macaroni and Cheese
Kathy Mansfield

Kathy's Comments: This recipe is adapted from my Mom’s delicious homemade macaroni and cheese. I live over 700 miles away from Mom, but every time I go home (usually summer and Christmas), she makes sure to have macaroni and cheese ready for me. I don’t often make the dish myself, but when I do I usually add the jalapenos for a little kick! In earlier years I used Jalapeño Cheese Whiz, but I haven’t been able to find it in my local grocery store the past few years. This dish is definitely a crowd pleaser and can even be served as a main pasta dish rather than as a side.
Cast Iron Required:
- Roaster/Casserole pan
- 1 16 oz. box macaroni noodles
- 1 8 oz. Velveeta cheese, cubed (8 oz. jar of Cheez Whiz may be substituted)
- 1-2 fresh jalapeños, chopped fine
- 1/2 stick butter
- 1 cup milk
- 2 cups grated cheddar cheese, in all
- Salt and pepper to taste
- Paprika
Cook macaroni noodles according to package directions. Butter a 9x12 cast iron baking dish. Mix noodles with Velveeta cheese, chopped jalapeños, butter, milk, and one cup of the cheddar cheese. Add salt and pepper to taste. Spread evenly in baking dish. Cover with remaining cheddar cheese. Sprinkle with paprika. Bake at 350 degrees for approximately 20 minutes, or until bubbly.
Macaroni & Cheese Supreme
Cajun Men Cook

In making it this time, we used a cup and a half of white cheddar and a cup of regular yellow cheddar. The original recipe didn't call for it, but I added a little bit of grated yellow cheddar on top for some color. With flour, butter, onions and heavy cream, this makes for one delicious recipe.
I'd also recommend having a little bit of bread handy. This recipe might leave a little bit of butter at the bottom of the bowl. A nice piece of bread can make good use of this!
Kathy's comments: Okay, okay. I know I said I was biased against onions in my mac and cheese, but in THIS recipe they are awesome! I know it's because they are sautéed first. Out of the four recipes, this was my favorite. In the past I haven't been as fond of this particular dish, but this time we used cooking wine rather than regular wine. I always thought in year's past that the wine taste was just a bit strong, but with the cooking wine, the flavor was perfect. I was sad to eat the last spoonful.
Cast Iron Required
- 10 1/4" skillet
- 1 8 oz. elbow macaroni
- 3 tablespoons butter
- 1/4 cup onion, chopped
- 3 tablespoons flour
- 1/2 teaspoon salt
- 1/8 teaspoon black pepper
- 1 cup heavy cream
- 1/2 cup white wine, (or vermouth)
- 2 1/2 cups extra sharp grated cheddar cheese
Directions:
Boil macaroni in boiling salted water according to directions. Drain. Set aside. Meanwhile melt butter, add onion, sauté till tender. Stir in flour, salt and pepper.

Slowly add cream and wine. Cook over low heat, stirring till thickened. Stir cheese until melted.

Add macaroni.

Pour into casserole dish and place in a 350° oven. Should be thoroughly heated and cheese sauce browned and bubbly—about 20 minutes.

What about you? What's your experience with macaroni and cheese in cast iron? Leave your thoughts, and if you want, your favorite recipes in the comments.
Feel free to leave your thoughts or ask questions in the comments below, or you can contact Rick directly at rick@cookingincastiron.com or Kathy at kathy@cookingincastiron.com.
Crawfish Fettuccine in Cast Iron

This coincided with the fact that we still had a pound and a half of crawfish in the freezer from our trip to Louisiana in July. Kathy had been suggesting for a while that we use them in an étouffée, but I wanted to make something with them we'd never made before. I'd been thinking about a crawfish fettuccine which I'd had in restaurants, but had never made myself. However, I'd made other fettuccine dishes before, so I figured it was time to combine the best of both worlds. Kathy and I have a hundred or so cookbooks, so I pulled out about a half dozen different books containing crawfish fettuccine recipes as well as two recipes on the internet and let her decide. I told her she could pick the recipe and I'd make the dish.
Kathy picked the recipe, "Brenda's Crawfish Fettuccine" from the Real Cajun Recipes website. This recipe looked extremely easy to prepare (and it was), and the ingredient list was fairly simple. She had also been skeptical about bell peppers in fettuccine which I thought was fine, but I wanted to make something both of us would eat. This was the only recipe that did not call for them. Plus, most of the crawfish fettuccine recipes I looked at simply had the topping placed over the cooked fettuccine. I liked this one because it baked together in one dish.
However, I noticed one problem right away. The recipe called for 12 oz. of fettuccine, but the average box sold at the grocer is 16 oz. However, I love that the Real Cajun Recipe website has a built in ability to scale recipes. The original recipes said that it would make 6-8 servings, but what I discovered was that as is, it was actually set to six servings. By increasing it to eight servings, the amount of fettuccine increased to 16 oz. However, the rest of the ingredients were at odd measurements such as one and 3/10 onions. So what you see below is my adaptation as to how I made it. All I can tell you is that it was quite good, and Kathy said it was the best meal she'd ever had (however she says things like that all the time!).
CRAWFISH FETTUCCINE
Cast Iron Required:
- 5 qt. Dutch Oven
- 1.5 medium chopped onions, (or 1 and a 1/2)
- 8 tbsp stick butter (1 stick + 3 tbsp)
- 2 chopped celery ribs
- 5 tbsp flour, heaping
- 1.5 lbs. crawfish
- 2 & ¼ cups Half and Half
- 1 8 oz. Velveeta cheese
- 16 ounces fettuccine
- salt, black and red pepper to taste or Cajun seasoning

Sauté onions and celery in butter in the bottom of a 5 quart cast iron Dutch oven.

Add flour gradually, then half and half and cheese heat until the cheese is melted.

Add crawfish and simmer for approximately 25 minutes, stirring constantly so that mixture does not begin to scorch. Season to taste. Cook fettuccine according to package directions, and add the boiled fettuccine into this mixture. Place in the oven and bake for 20 minutes at 350 degrees.

Above: the final product out of the oven. It was bubbling and quite hot.

On the plate with a nice piece of homemade bread.
A handful of notes: I used one medium-sized onion and one small onion. You could just as easily use two medium onions, and I don't believe it would overpower the recipe. Technically, after converting up to the greater number of portions, you would need more than 8 oz. of Velveeta as called for in the original recipe. It's very difficult to find the 8 oz. package these days, and we had purchased the 16 oz size. We'd already used half of that in another recipe a few days earlier, so the 8 oz. was all we had left. I don't feel that this took away from the recipe at all because of all the cream in it as well. Also, we used a pound and a half of crawfish because that's what we had. Contrary to the look of the plate above, there was almost a crawfish in every bite. If you don't want that much, scale it back to a pound.
Finally, the original recipe called for everything to be combined in a 2 quart casserole dish. I can't imagine that this would be large enough. With only slightly increasing the ingredients, we filled a five quart dutch oven with only about an inch and a half to spare as you can see in the pictures. The advantage of using one dutch oven is that everything can be cooked in the same pot (with the exception of boiling the pasta).
Feel free to leave your thoughts or ask questions in the comments below, or you can contact Rick directly at rick@cookingincastiron.com.


