


Why Cast Iron? Five Reasons
Every now and then, someone asks me--“So what’s the big deal about cast iron?” There are plenty of other pans around. Plenty of other ways to cook. Why should someone entertain the use of cast iron cookware to begin with?
Here are a few reasons to use cast iron. Maybe you’ve been toying with the idea of cooking in cast iron for a while, and this will help to push you over.

There are also serious questions raised about the danger of cooking surfaces such as teflon when used at high temperatures (see MSNBC: “Teflon Chemical Cancer Risks Downplayed”). It is well known that fumes from teflon pans (and possibly other chemically treated non-stick surfaces) can cause the death of birds kept as family pets (see “The Silent Killer” by Joanie Doss).
Aluminum pans aren’t necessarily safe either. Though a definite causal relationship has not yet been established, a common factor seen in Alzheimer’s patients are aluminum strands found in the brain (see Alzheimer’s Society: “Aluminum and Alzheimer’s Disease”). Whether aluminum cookware is one of the factors in this is yet unknown, but some believe that heating foods at high heat in aluminum pans causes the metal to leech into foods. Note also that aluminum pans are almost universally used in restaurants where food is usually cooked quickly at very high temperatures.
On the other hand, cooking in cast iron negatively affects only an extremely small portion of the population--those who suffer from too much iron in the blood. This condition is referred to as hemochromatosis. This is not an issue for the average person, and for those who suffer from too much iron in the blood, I’d still recommend enameled cast iron for all the other reasons mentioned here.
Another healthy aspect of cooking in cast iron is that it is so enjoyable, you will be encouraged to cook at home more often, which is always healthier than eating out or warming up pre-packed foods in the oven.

Although cast iron is making a strong return to America’s kitchens, it never left the campsite. It was cast iron that sustained America from the earliest pilgrims to the pioneers who traveled west. Cast iron is hardy and very difficult to permanently damage unless it’s downright abused. I’ve easily used some of the same pans in my kitchen when we’ve gone camping as well. Although most campers will want to obtain dutch ovens specific to the campfire, a lot of us can confess to throwing regular dutch ovens in the fire, too, with no harm coming to them because of it.

Before we started using cast iron as our main cookware, there’s no telling how many other pans we eventually wore out and then threw out. Non-stick heating surfaces on those other pans eventually started flaking, so we’d throw them out. But after switching to cast iron a few years ago, I fully expect to be using the same pans--including my grandmother’s--for at least another three or four decades (assuming I live that long). After that, I will pass them on to others, which leads to the next benefit of cooking in cast iron...

We also have a couple of cast iron chicken fryers left to us from Kathy’s grandmother that I’m in the process of restoring. According to Kathy’s mother, her father used to often clean these pans by throwing them into a fire in the back yard!
Now think about it for a second. Do you really think that your aluminum pans, your chemically-treated non-stick pans, or your electric skillet will be in use too many years from now? Is there any chance you'd be able to will them to your family members? Would you even want to?
With cast iron, it's a different story.
When done with thought and care, the preparation and eating of meals together can be very intimate and memorable occasions. In today’s busy society, too often people don’t take the time to make a meal from scratch and sit around the table together. When I make my grandmother’s cornbread (see recipe here) in her skillet, I think of all the times I sat at her table eating her wonderful foods. That skillet is forever tied to her memory. I can’t use it without thinking of her. If I had to only keep one item in my cast iron collection, I would choose that one.
One day I will pass on my cast iron to others. I hope that when they use them, they will think of me and the good times we had sitting around the dinner table.
Perhaps you have a cast iron pan or pot from a family member who has now passed on. Take that pan down, relive some memories and create some new ones.
Feel free to leave your thoughts or ask questions in the comments below, or you can contact Rick directly at rick@cookingincastiron.com.
Tip: Baking in Cast Iron is for More than Cornbread

The other night a couple told Kathy and me, “We need to have you come over and show us how to do more with our skillet than just make corn bread.”
Oh where to even begin?
But many folks who use their cast iron regularly, don’t realize how versatile something like a skillet is for ordinary baking.
When it comes to baking and cast iron, I’m convinced of two things:
- Food tastes better in cast iron. If you’ve ever had macaroni and cheese baked in a cast iron skillet or a casserole cooked in a dutch oven instead of a traditional casserole pan of aluminum or glass, you know what I mean. Cast iron provides a texture to the outer layer of food that just can’t be duplicated in other pans.
- Baking is VERY “healthy” for your cast iron’s seasoning. If you only use your skillet on the stove top, you will probably have to re-season it (at least the inside bottom of the pan) more often than you will if you’re using it inside the oven, too.
Feel free to leave your thoughts or ask questions in the comments below, or you can contact Rick directly at rick@cookingincastiron.com.
Can I Use Cast Iron on a Glass Top Range?

I often have people email me asking if it’s okay to use cast iron with glass top ranges. Some range manufacturers include warnings against using cast iron with their products. And the RangeKleen fryer we reviewed last year had a warning against its use on a glass surface. Of course, we ignored that, and I’ll tell you why below.
What’s the big deal about cast iron and glass (or even ceramic) surfaces? Well, glass can get scratched. We live in such an over-protective culture that we often throw the baby out with the bath water when it comes when it comes to erring on the side of judgment. For instance, many schools have gotten rid of playground equipment because some children might get hurt on it. I got hurt on playground equipment when I was a kid, but I promise you, I’d rather have had it than to not have it. Ladder companies tell us not to use that top step as a step because some people have been reckless enough to do it and have gotten hurt. I wonder how long before you can’t buy a ladder. And just try finding a diving board for a backyard pool these days. You can find one, but it’s getting difficult.
Anyway, companies that make glass top ranges don’t want you to call them up complaining about how easily their surfaces get scratched, so they simply tell you not to put anything heavy on it-- especially cast iron! By the way, the heaviness of cast iron could also cause your glass top range to break if you dropped a pan, so this is another concern with the company.
Now, I don’t want you to call me up complaining about your scratched or broken range top either, but I can tell you that IF (this is a big if) you are careful, you can use a glass top range or stovetop with no problems. In fact, if you notice in most of my pictures, such as the one above, Kathy and I have a glass range right now. In reality, I much prefer a gas range, but this is just where we live right now and we’ve made do.
I can tell you that we use cast iron all the time on our glass top range. Cast iron works great on a glass top range. In fact because a glass range heats evenly and cast iron heats evenly, it’s a pretty good match. I would even guess that today, gas ranges are probably in the minority for most kitchens even though most of us who really “get into” cooking prefer them.
If you have a glass top range, let me offer a few suggestions for keeping it unscratched (and unbroken!) and in tip-top shape.
- Keep you range top CLEAN. Usually what scratches your range top is some kind of abrasive substance between the surface and your pan. Also, make certain that your cleaner is specifically designed for the range you have. Usually the manufacturer recommends specific cleaners. If yours doesn’t, check on the label of the product you are buying. Glass range cleaners can usually be found at appliance stores, home improvement stores, discount stores and more.
- By the same token, keep the bottom of your pan clean. If you’ve got gunk building up on the bottom of that pan, know that it can damage a smooth surface range.
- Don’t slide cast iron around on the surface. Sliding any pan around--cast iron or otherwise--is going to eventually leave marks on the surface of your range. Pick it straight UP. Which, of course, leads to...
- Set cast iron down gently onto your smooth-top cooking surface. If you’ve ever been burned by a pan coming out of a 400° oven, you know how easy it is to simply drop it on the floor or your range top. Use both hands and use pot holders that are thick enough. I’ve learned the hard way that those little mitts that fit over the the skillet handle is not enough protection for a pan that has been in a hot oven for any period of time. I also feel that the short handle on newer skillets across from the regular handle is genius. This really helps the cook use both hands when handling a hot skillet.
Feel free to leave your thoughts or ask questions in the comments below, or you can contact Rick directly at rick@cookingincastiron.com.
Experimenting with Scallops

The vast majority of my experience with scallops comes from eating them, not cooking them. I’ve also noticed that scallops are often the foil on Gordan Ramsay’s Hell’s Kitchen as he screams at the competing chefs that the scallops are either raw (undercooked) or like rubber (overcooked) before hurling them against the wall. So, in light of the fact that I do like scallops quite a bit, and because I took Ramsay’s rants on television as a bit of a personal challenge, I decided I would see if I could cook them myself.
I scanned the internet for methods as well as asking for input on the Castiron Cookware discussion list. I wanted to start out as basic as possible knowing that I can later expand from there. After reading as much as I thought was necessary, I settled on a very basic method.
First, I decided upon using a skillet a bit larger than my normal 10 1/4” that serves as my primary cast iron instrument. Having read that scallops need to have room when they cook, I chose a Lodge Pro Logic 12" skillet
The only daunting aspect to the scallops was the price. Keep in mind that we now live in Kentucky, so sea scallops are not a native resource. They have to be shipped in. Although I’ve now found a slightly less expensive source for scallops, the ones you are looking at in the picture above cost more than a dollar each!
As I mentioned, I chose a very basic method for cooking the sea scallops. I heated a couple of tablespoons of olive oil in the 12” skillet. Then I cooked the scallops about two minutes each side, lightly sprinkling them with salt and pepper. When cooked properly, the scallops will have a light golden brown color to them. The finely manicured hand in the photo above is not mine, but Kathy’s as I took the picture; but you can see the eight that have been turned and the four remaining to be turned.
On the night that I experimented with scallops, we had brave guests over for dinner who sampled them with me. I chose to make the scallops an appetizer rather than the main dish not only because of their price, but also due to the fact that I was experimenting with them. Nevertheless, they came out perfect which makes me really wonder about the competence of those competing on Hell’s Kitchen. I mean, I really cannot overemphasize how easy these were to prepare.
With the scallops, I simply provided two dishes of melted butter and garlic for dipping, one of which had a few drops of Habanero Tabasco. Everyone thought the scallops were great, even Kathy who rarely strays from steak, burgers, or catfish.
Now that I’ve successfully cooked the scallops with the most basic of methods, I can begin experimenting with new recipes. What about you? How do you prepare scallops? Do you have a favorite recipe? Please share your thoughts in the comments below.
Feel free to leave your thoughts or ask questions in the comments below, or you can contact Rick directly at rick@cookingincastiron.com.
More on the Lodge Cast Iron Grill
Last month, I posted a review on the Lodge Sportsmans Grill (LSG). Yesterday, I got an email from a reader named John. He wrote:
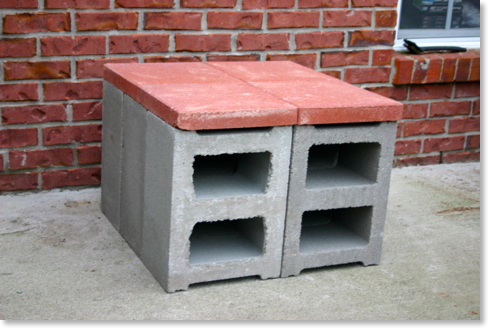
I recently got the Lodge grill due to my need for a grill. Your review was very handy in explaining what to expect (I ordered via Amazon). I even bought cinder blocks and tiles to create a very similar setup (see attached photo)!
Here is the picture of John’s cinder block setup and mine for comparison below it.


The LSG gets extremely hot, and it’s very important to have some kind of surface below it that cannot be damaged. If you place one of these grills on a wooden deck surface, it will definitely leave burn marks. Patio stones, cinder blocks, etc. provide good protection. Plus, it gets the grill off the ground which is easier on one’s back!
John asked a few questions in his email which are in bold below, followed by my answers.
I used it once and am trying to figure out how to clean the parts other than the grill top, which I cleaned inside. I will try the aluminum foil tip next time (I forget to line it before using). I read some guy used a shop vac.
The shop vac is ideal. Small shop vacs are available that would be perfect even if only used for the LSG (assuming you grill enough to justify the purchase). When I clean mine, though, I remove the top grill and set it aside. Usually the fire grate still has coals on it, although these are really nothing more than ash themselves. I try to carefully pick this up to include as much of the ash as possible and pour this off into a trash bag (it’s very important to make sure none of the coals are still live!). Then, I take off the draft door and the fire door and simply turn the fire bowl over, dumping out any loose ash. I also keep a little brush inside one of the cinder block holes that I use to brush out extra ash. It’s really not a big deal if there’s a coating of ash remaining on the sides. As long as the grill is not getting wet, the ash is not going to harm the inside of the fire bowl. However, ash can be very corrosive on cast iron if it gets wet. Of course, keeping any cast iron item out of a wet environment should be assumed anyway.
At the end of last summer, I gave the fire bowl a really good thorough cleaning with hot water and a scraper. Grease will build up and carbonize on the sides and in the bottom. This itself will not really hurt the grill, so I don’t worry about it during the summer months of prime grilling. At the end of this year, after two years of use, I may put the fire bowl in the oven and turn on the cleaning cycle. Afterwards, everything but the top grill can be repainted with black stovepipe paint to look as good as new.
How do you light the coals? I used a chimney starter and transferred them over when they turned gray. But I realize that probably didn't give enough time for the cast grill to get hot enough.
If you don’t use a chimney starter, the other obvious is charcoal lighter fluid. Some feel that lighter fluid can affect the taste of grilled food. This is definitely true if the lighter fluid is a cheaper brand. It may not be as true with some brands. Regardless, it’s worth the effort to experiment. Most folks like a chimney starter. When using one of these, after putting the coals on top of the fire grate, place the top grill in place and let it sit for at least ten minutes before placing anything on the grill. This should give it enough time to heat up.
Any tips on the using the draft door?
I always have the draft door slightly open to allow air to circulate underneath the coals. This allows them to stay very hot while cooking; but if the coals are too hot, I close the door to allow less oxygen to get to the coals.
This is probably completely obvious, but the product descriptions say there are 2 adjustable levels. Do they mean you flip the top grill over (so the feet are sticking up)? Or is there some other way that I didn't notice to change the height?
Yes, you’re exactly right. If the grill is turned over, it will be lower and closer to the coals. Honestly, I rarely do this because the grill gets so hot with the top grill turned up right. However, I’ve learned (the hard way) that when grilling round hot dogs, the lower setting keeps them from rolling off. However, you must use less charcoal if cooking something like hot dogs, brats, or even smoked sausages on the lower setting.
I hope that helps some. I know that John is going to enjoy his grill. I am sold on the LSG, and will never purchase any other grill unless I simply get a second one to use beside the first one!
Feel free to leave your thoughts or ask questions in the comments below, or you can contact Rick directly at rick@cookingincastiron.com.
Review: Lodge Sportsman's Grill

Therefore, I want to revisit some of what I wrote last year on Amazon, making a few modifications and updates now that I’ve had this little cast iron wonder for a little over a year.
I've always been particular to charcoal grilling over gas. But in my adult life, I've previously been satisfied getting the cheapest charcoal grill available and using it until it fell apart. Now, however, since I have the Lodge cast iron Sportsman's Grill (from this point forward, simply LSG), I anticipate that this will be the last grill I ever own. Because it's cast iron, as long as it's well cared for, it should last a lifetime.
My wife got me this grill for an anniversary present. Having developed a passion for cooking in cast iron like many of you, I had been eyeing it for quite some time. When it arrived, it came in a box unassembled, but I had it put together within a couple of minutes. All of the pieces simply stay in place with gravity with the exception of the bottom which is screwed into the fire bowl.

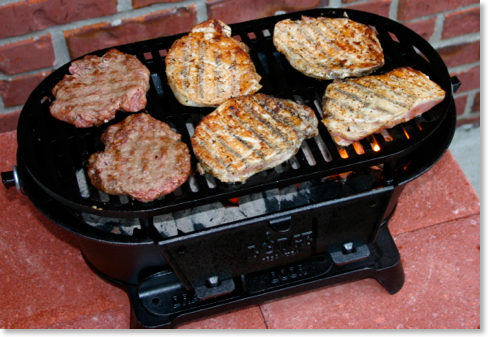
I enjoyed this grill so much last year, I believe we grilled out more last summer and fall than in the previous five or so years combined. While almost anything can be cooked to perfection on the LSG, I’ve also since discovered Omaha Steaks. We enjoyed them so much last year, we had to adjust our monthly grocery budget just to make sure we could place at least one modest order a month. I’ve known for a while that their steaks and burgers are great, but on Memorial Day earlier this week, I also discovered that Omaha Steaks also carries some of the best hot dogs and brats I’ve ever tasted. The brats were much more flavorful than many I’ve tried, and the hot dogs were three times the size of a normal frankfurter with great taste to boot.

Three brats, four burgers, and one ribeye--merely part of all that we grilled on Memorial Day this year.
Here are some things I've discovered over the last year or so cooking on my Lodge Sportsman’s Grill:
1. If you're going to use this grill a lot, you don't want to have it sitting on the ground. Or at least I don't with my sore back! So rather than finding some weatherproof pre-made table, I constructed a little grilling platform out of cinder blocks and patio stones. As you can see in the pictures, it looks much more attractive than it sounds. The materials cost me merely $17 and I guarantee you I have a more sturdy grilling area than anything I could have purchased. There’s no strong wind that’s going to blow over this grilling stand! Plus, I can temporarily stow tongs and spatulas in the open spaces of the cinder blocks.
2. Because cast iron heats evenly, the entire top grill is hot. I don't have to worry about colds spots on the grill as I've had to in the past assuming that I’ve distributed the charcoal fairly evenly. I read about one user of the LSG spraying the grill with olive oil-flavored Pam, which I often do, too. And with the oil based marinade I sometimes use, food sizzles when I set it down on this grill, just like when I put it in a cast iron skillet. I never get tired of the sound of cast iron sizzle whether it comes from a skillet or the LSG.
3. Speaking of a cast iron skillet, this grill is the best of both worlds. The grates of the top grill are flat on top and the slits are fairly narrow. It really is like grilling and cooking in a skillet combined. By oiling the grill before use, I've yet to have anything stick to it. And the slots are much more narrow than grills I've used in the past, so the danger of a burger falling through into the coals are a thing of the past.
4. The LSG will cook just about anything you throw on it. I’ve cooked steaks, burgers, chicken, pork chops, brats, hot dogs and more. I really like the control I get over the food. So many times with a traditional charcoal grill, I've scorched food if I wasn't paying attention. Because this is made of cast iron and because of the flat cooking surface, it's much easier to control the cooking. Pork chops I cooked on the grill were nicely browned on the outside, but not burnt and juicy inside. The burgers were perfectly done as well. It's much easier to control the fire on this grill than others I've used.
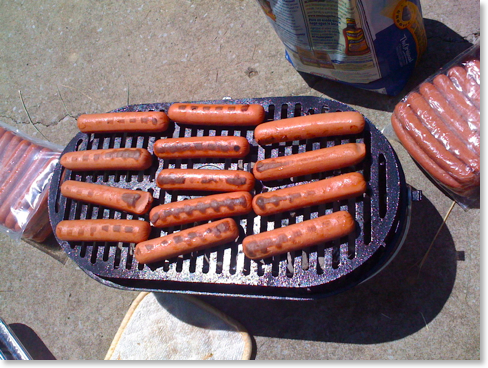
5. Warning: be careful with perfectly round hot dogs. There's no side to the grill surface and a round hot dog can simply roll off if you're not careful. Hot dogs that are a bit squared are much easier to control, and it helps to not crowd them so that they can be turned over. Notice the attractive brown (but not black and scorched!) stripes. Another solution as suggested by Greg on Black Iron Dude is to simply turn the top grill upside down so that there’s a small protrusion at the edges to keep your dogs from falling off. I haven’t tried this yet, but now I wonder why I hadn’t thought of that!
6. Don’t think that this grill is not up to cooking for large groups--it is! My wife was concerned that the grill was so small that we wouldn't be able to adequately entertain guests. As you can see here and in the pictures in our gallery, I easily fit eight quarter pound burgers from Omaha Steaks on the grill. That's perfectly adequate for any entertaining that we will do, and even if we have more folks over, two or three rounds of eight won't take that long.

7. Due to the LSG's flat surface on top, I could easily cook in a skillet or dutch oven on top of this grill without the pan wobbling. I’ve cooked food in 8” skillets, 10 1/4” skillets, sizzle skillets, and even dutch ovens. It’s the perfect grill to take camping as it allows for a wide diversity in what kinds of food can be prepared.

When camping, the LSG can be used with a dutch oven as an alternative to placing the dutch oven directly into live coals.
“Mountain Man Breakfast” made in a dutch oven on top of the LSG.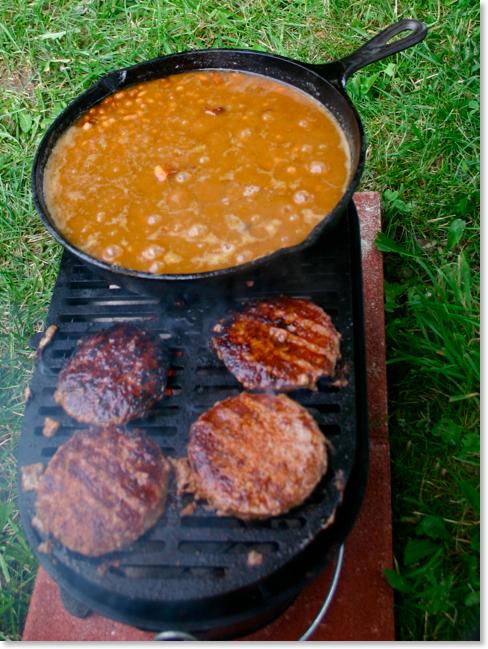
Baked beans in a rolling boil right next to hamburgers. The beans are in a 10 1/4 Lodge skillet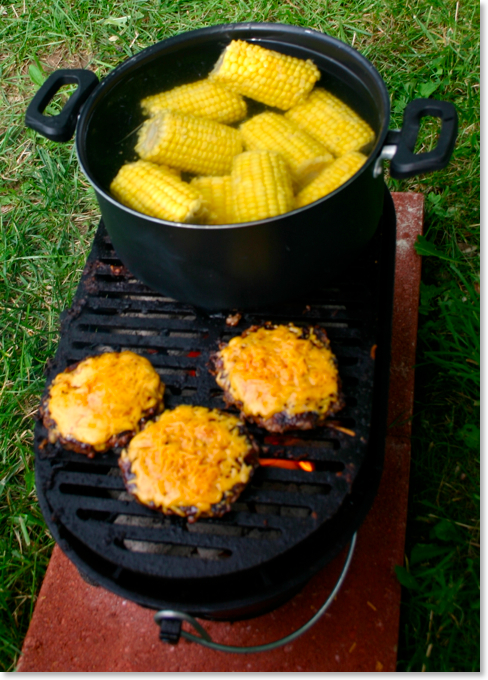
Cheeseburgers and corn on the cob (yeah, I know that’s not a cast iron pan, but it wasn’t my pan!)
Mushrooms & onions in olive oil on a sizzle skillet
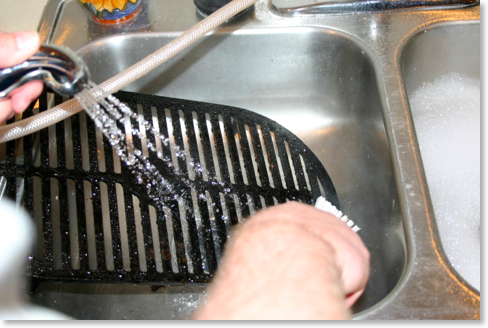
8. To clean the top grill, I've used a stiff plastic brush and the nylon scrapers you can get from any Pampered Chef rep for cleaning a baking stone. As with any cast iron, you don't want to use soap as it can strip the seasoning or even leave a soap taste. I simply take the top grill to the kitchen sink and scrub it down with the brush and hot water. I use the scraper to get any food between the slots. It can be a bit tedious to clean between every groove, but it's really not difficult to clean.
9. It may not be clear from the pictures, but the coals sit on a removable fire grate about an inch and a half above the bottom of the grill. This allows for air flow under the coals via an adjustable draft door. As the coals turn to ash, some will fall through the grate.
10. For cleaning the bottom part below the fire grate, I've experimented with lining the bottom with aluminum foil to make removing the ashes a bit easier. I did this a lot when I first bought the grill, but I do it less often now. If you try this, you want to be careful not to let the foil block the vent behind the draft door so that you can have air circulating under your coals. After I lift out the ashes, I've simply been sweeping out the ash dust that remains. As with any grill you don't want to leave heavy amounts of ash in place as it can become corrosive if it mixes with moisture.

11. As mentioned above, I clean the top grill like I would any cast iron skillet. If necessary, the grill top could even be re-seasoned in the oven or perhaps simply by covering it in a thin layer of lard or other cooking oil and placing it over hot coals. I haven’t had a need to do this yet, but I don’t see why it wouldn’t work.
12. For the start of this year’s grilling, I covered the bottom part of the grill with black stovepipe paint. The idea of painting cast iron would certainly be taboo for many, and I would agree if we were talking about the cooking surface. However, everything below the top grill--the fire bowl, the bottom, the fire grate, the fire door, the draft door--never comes into direct contact with food. Interestingly, when a LSG arrives brand new, every piece of the grill is covered in Lodge’s pre-seasoning. Again, this makes perfect sense for the top grill, but not for the rest of the grill. By this spring, the bottom part of my grill had lost all the pre-seasoning in quite a few places (the grill does get extremely hot, after all). I even had a couple of minor rust spots. While I could have simply re-seasoned it, this seemed neither practical or necessary. Instead, I cleaned everything really well before my first grilling of the year, and then I covered everything except the top grill with black stovepipe paint that is good for up to 1200° Fahrenheit. I am very pleased with the results and the painted grill makes it look brand new again. If this is something I need to do every year or two, I don’t mind at all. And my hunch is the paint will act as a better protection from weather than the mere pre-seasoning from Lodge.

This is a shot of my grill that I took last week. Even though I’ve had it for over a year, it still looks
brand new because I completely painted everything but the top grill with black stovetop paint.
13. If you're going to keep the grill outside, you must get the Lodge Sportsman's Grill Cover. The cover is long enough for the elastic bottom to fit under the legs of the grill keeping water out from all sides in the case of rain. Outside of that, I’d recommend bringing the grill inside if it’s not going to be used for a while, perhaps during the winter months.

14. For travel, I purchased a couple of extra patio stones that I'm keeping in the back of my truck. This grill is portable enough that I’ve taken it with me on a number of occasions. But what do you do if you’re through tailgating and the grill is still hot? The extra patio stones were the answer. This way when the grill is hot after I've cooked with it, I won't have to worry about the hot feet eating through the liner in the bed of my truck. I can simply set it on the patio stones.
15. Yes, you can carry it with the handle, but it’s only balanced if all extra pieces are removed. Don’t try to carry this grill by the handle for any long distance if it is fully assembled. The grill becomes much lighter and easier to carry if the top grill, fire door, and draft door are removed first. Then it remains fairly balanced simply with the wire handle itself. However, I would note that I was grilling one time last fall when a sudden downpour threatened to end our grilling all together for the day. With the careful help of a friend, we picked up the grill with live coals and carried it (protecting our hands with gloves and hot pads) through the house to the front where I had cover from the rain.
Have questions about the Lodge Sportsman’s Grill? Want to share your own experiences? Feel free to leave your thoughts or ask questions in the comments below, or you can contact Rick directly at rick@cookingincastiron.com.
Breaking in the New Wok
In his book Cast Iron Cooking: From Johnnycakes to Blackened Redfish, A. D. Livingston famously says, “If you’ve got a dutch oven, you don’t need no damn wok.” And while in essence that’s true--that you can cook just about anything in a dutch oven that you can cook in a wok--it doesn’t mean that a wok isn’t of tremendous value or even that a wok won’t be a better choice for any kind of stir-fry dish.
Kathy and I have been having our own “Asian night” for a while. A few years ago, her brother, Clark, gave me a traditional steel wok. We’ve used it for stir-fry on many occasions, almost always with rice and whatever leftovers were in the refrigerator. Lately, we added a very basic egg drop soup to the menu as well, and at this point I decided I really needed a second wok.
Of course, if I was going to buy a wok myself, knowing that Lodge makes a cast iron wok, I knew this was the one I had to have. In looking at customer comments on Amazon.com and other places, while some folks raved about the Lodge cast iron wok, I also discovered there were wok purists who decried it for being too heavy or that the cast iron was simply not the right kind of metal for stir-fry.
Whatever.
If you’re reading this post, you would probably agree with me that most food is simply better in cast iron! With this assumption in hand, I ordered the Lodge cast iron wok.
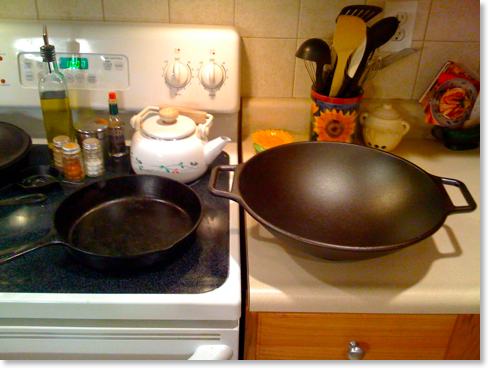
My first impression regarding the new wok was how large it was! In the picture above, you see it next to a standard 10 1/4” cast iron skillet. The weight of the cast iron makes for a pan that stays still. I don’t have to hold on to one side of it as I stir.
And as I’ve mentioned before, unfortunately, our current home has an electric range (never again!), but the diameter of the base is small enough that I can actually use the wok--as big as it is--from the smaller burner. As with any wok, by concentrating the heat at the bottom, food that needs less heat can be pushed to the sides.
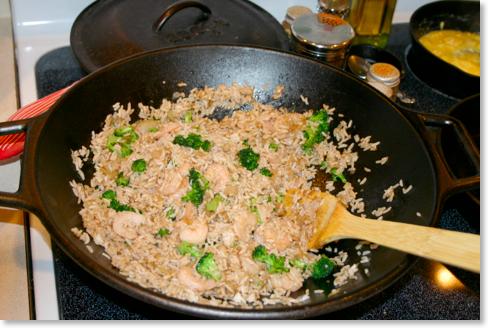
STIR-FRIED RICE
Cast iron required: cast iron wok
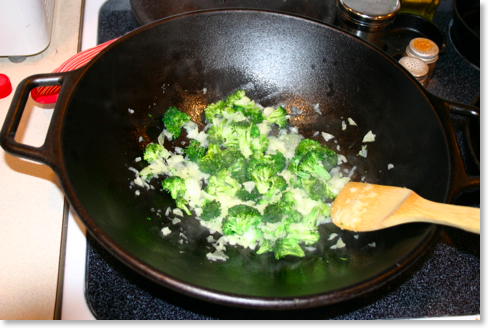
When I make stir-fry, I usually start with sesame oil which I allow to get hot at the bottom of the pan over a medium heat. The sesame oil will give a dish a nice Asian flavor. As I mentioned, we often add whatever is available from leftovers, but if we are including ingredients like uncooked bacon, shrimp, or even raw vegetables like onions (green, white, or yellow) or broccoli, it’s best to add these ingredients first to the oil. I want to always be careful that any meat is fully cooked. Any meat or raw vegetables should be added before the rice which should already be cooked. When adding broccoli, I generally cook it to a bright green, but Kathy often wants it cooked a bit longer.
At this point, I will add in rice that is already cooked. Usually we have leftover rice from another meal, which is often our excuse for stir-fry in the first place. Soy sauce is added to taste. Now the primary purpose is to heat the rice to the same temperature as the rest of the ingredients. The final touch is to add a bit of egg. If raw egg is added to the mixture at this point, it will simply be lost. A better method is to lightly scramble a couple of eggs in another, smaller skillet and right before they are a the point I might serve them as a breakfast item, I take them and add them to the stir-fry, mixing them in without mixing them so fine that they are lost. White pepper and a little more soy sauce or even sesame oil can be added if necessary to taste.
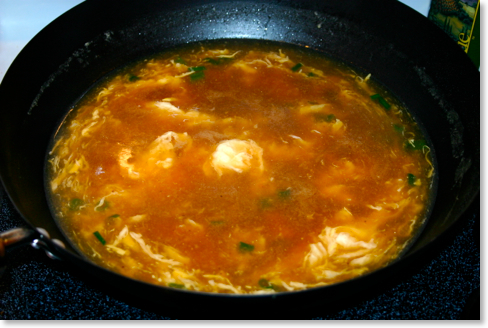
EGG DROP SOUP
Cast iron optional, but a wok (steel or cast iron) is a nice touch
We now use our original steel wok for the egg drop soup. Technically, you don’t need a wok to make egg drop soup, but it certainly seems appropriate to make it in one. The recipe is a very basic one by Rhonda Parkinson which I found a while back on the internet. Although cast iron isn’t really required, I include this recipe here for the sake of completeness. This recipe is basic and easy to make, and to us, it’s as good or better than any egg drop soup we’d get in a restaurant.
Ingredients:
- 4 cups chicken broth or stock
- 2 eggs, lightly beaten
- 1-2 green onions, minced
- 1/4 teaspoon white pepper
- Salt to taste
- A few drops of sesame oil (optional)
Directions:
In a wok or saucepan, bring the 4 cups of chicken broth to a boil. Add the white pepper and salt, and the sesame oil if using. Cook for about another minute.
Very slowly pour in the eggs in a steady stream. To make shreds, stir the egg rapidly in a clockwise direction for one minute. To make thin streams or ribbons, gently stir the eggs in a clockwise direction until they form.

Garnish with green onion and serve.
![]() MacGourmet users, click image to download recipe (or simply drag image to your MacGourmet recipe box).
MacGourmet users, click image to download recipe (or simply drag image to your MacGourmet recipe box).
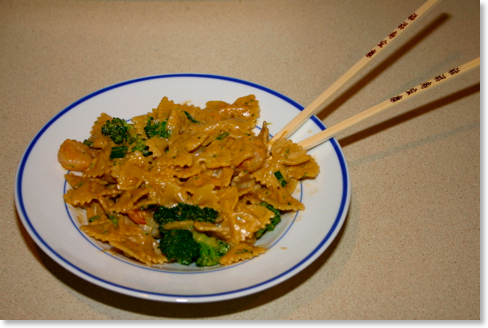
THAILAND PEANUT PESTO (shown here with optional shrimp & broccoli)
Cast Iron Required: Wok
Another recipe we’ve made recently in the wok is Thailand Peanut Pesto which I found on the Tabasco website. This recipe requires one to make a homemade peanut sauce which is just as good as anything I’ve ever had in a restaurant. Kathy generally doesn’t care for peanut-flavored Asian recipes, but she loves this one.
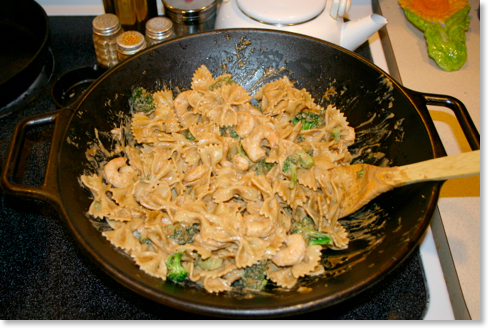
Ingredients:
- 1 cup unsalted roasted peanuts
- 1/3 cup Tabasco brand Soy Sauce
- 1 teaspoon Original Tabasco brand Pepper Sauce
- 1/4 cup honey
- 1/3 cup water
- 3 cloves garlic, minced
- 1/2 cup sesame oil
- 1 pound bowtie pasta, cooked according to package instructions
- 1/2 cup chopped green onions
Directions:
Place peanuts in the bowl of a food processor and process until finely ground. With motor running, add remaining ingredients except pasta and green onions, one at a time, through feeder tube. Process until a thick, smooth paste has formed.
Transfer mixture to a bowl; cover and refrigerate until ready to use. Toss with hot cooked pasta and garnish with green onion.
Makes 4 servings.
Try adding vegetables such as steamed broccoli or snow peas to this, or turn it into an entrée by adding cooked chicken or shrimp.
![]() MacGourmet users, click image to download recipe (or simply drag image to your MacGourmet recipe box).
MacGourmet users, click image to download recipe (or simply drag image to your MacGourmet recipe box).
Ultimately, I’m quite pleased with the cast iron wok from Lodge. It’s heavy so that it doesn’t move on the stovetop while stirring food in it, and everything I’ve cooked in it has been wonderful so far. Whether you are a cast iron aficionado or whether you simply enjoy Asian food, I highly recommend this wok for your cooking enjoyment.
Feel free to leave your thoughts or ask questions in the comments below, or you can contact Rick directly at rick@cookingincastiron.com.
Veggie Tales
Like most kids, I despised vegetables. In fact, I recall living solely on Spaghetti-O’s for a good portion of my growing up years. So, the fact that I will even go near vegetables as an adult is a minor miracle. All this to say, the following cast-iron vegetable dishes must be fairly tasty if I’m willing to put them on my plate. I hope you will enjoy them, too.
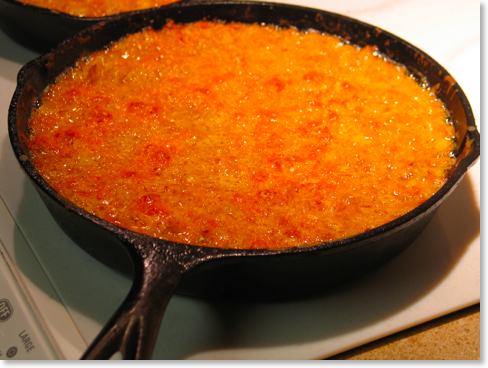
Mom’s Squash and Onion Sauté
Mom used to make this dish when I was younger, and I thought it looked absolutely disgusting, so naturally I refused to eat it. At some point in my thirties, I attempted the dish on my own with slight variations (sweetened, caramelized onions, etc.) and found a new favorite. Now Mom actually prefers my recipe!
CAST IRON REQUIRED
• 10 1/4” cast iron skillet
INGREDIENTS
- 4 large yellow squash, peeled and sliced fairly thin
- 1 medium Vidalia onion, sliced
- 1 Tablespoon olive oil
- 1 Tablespoon sugar or artificial sweetener
- Salt to taste
DIRECTIONS
Heat oil in 10 1/4 inch cast iron skillet. Sautee onions until almost caramelized.

Place squash slices on top of onions.

Cover and cook approximately 15 minutes over medium low heat, stirring occasionally to rotate onions to top of pile. Sprinkle sugar (artificial sweeteners such as Splenda work fine, too) after the squash has softened a bit. Add salt to taste. Cook until desired consistency.

(As you can tell from the pictures, I prefer mine cooked down quite a bit). Mmm, mmm, good!
Wendy’s Quick Green Beans w/ Shallots
My good friend Wendy Smith made this vegetable side for a meal while we were visiting in her home. As with the squash above, I’ve adapted the recipe to a more Southern-style “cooked until soggy” consistency rather than the healthier crunch to the vegetables and added good ole Southern-style non-healthy bacon (leave out the bacon for the healthier version).
CAST IRON REQUIRED
• 10 1/4” cast iron skillet
INGREDIENTS
- 1 package frozen green beans (small or medium bag)
- 1 shallot, chopped
- 1 slice bacon, cut into tiny pieces
- 1 Tablespoon olive oil
- 1 Tablespoon sugar or artificial sweetener
- Salt to taste
Heat oil in 10 1/4 inch cast iron skillet for medium bag of beans or 7 inch cast iron skillet for small bag of beans. Sautee chopped shallot and bacon bits until bacon is not quite crisp and shallot is almost opaque.

Add frozen green beans.

Cover and cook over medium low heat until beans are heated through. Sprinkle with sugar (I use Splenda).

Add salt to taste. As with the squash dish above, I tend to cook the beans to a nice, soggy consistency

Feel free to leave your thoughts in the comments below, or you can contact Kathy directly at kathy@cookingincastiron.com.
Who Cares about the Cold? It's Grilling Time!


So, fast-forwarding a little piece of summer into the bleak frigid cold of March’s desperate weeks might sound blasphemous, and we don’t take it lightly, but there are times when a lift to the spirit is necessary in order to loosen the stranglehold of cold bitterness around our souls.
One simple, yet effective means of brightening these dark days is to bring the pop and sizzle of meat on the grill indoors with our cast iron grill pan or griddle. Our collection includes a round grill pan and a two burner, two-sided griddle. Each has its own advantages and a drawback or two. The round pan isn’t large enough to cook for all four members of our family at one time, and the surface of the griddle side will suffer the direct flame of the gas grill when flipped to use the grill. However, the sharp ridges accomplished with cast iron far out-class the paltry bumps the aluminum pans attempt to pass-off as grill ridges. Do we really expect those pseudo-ridges to provide the grill lines necessary to bring the taste of summer to our mouths? This is where the cast iron grill pans cook like no other. So we have the grill, next comes the fare.

An early frustration in our grill pan experience was having the food stick to the grill ridges when trying to turn the food. This frustration was overcome through having properly oiled ridges, technique, and patience; the most important being patience. Using a basting brush aids in the application and maintenance of oiling the ridges, and is the practice I typically follow. However, the oil can quickly drain away from the ridges. Alternately, apply a thin layer of oil to the meat in addition to the grill.


Feel free to leave your thoughts in the comments below, or you can contact JT directily at ironman@cookingincastiron.com.
Slow Cooker to Dutch Oven Conversion
Slow cookers are wonderful things. Of course where I grew up, we simply called them “Crock Pots.” But since that’s a trademarked brand name, they are usually referred to as “slow cookers” when speaking of the devices generically. They are great for cooking an entire meal by planning a few hours ahead. Just throw in the ingredients, set the temperature, and let it go. However, as any cast iron aficionado will understand, sometimes you just prefer to break out the black iron.
And as any experienced cast iron cook knows, you don’t really need special cookbooks geared to cast iron cookware--although they are certainly nice to have. In reality, most recipes (with a few exceptions) can be cooked in cast iron. This is especially true of slow cooker recipes since a slow cooker is really nothing more than an electric dutch oven if you think about it. However, some conversion of cooking time is required.
Last summer, Kathleen Purvis of The Charlotte Observer wrote an article (no direct link remaining to my knowledge) on this exact subject that I saw reprinted in a number of papers around the country. To convert from cooking times from a slow cooker to a dutch oven, she offered this basic principle:
A recipe that is cooked on the low setting in your slow cooker will take about a quarter as long in a Dutch oven in a 325-degree oven (if it cooks for 8 hours on low, it will take two to three hours in the Dutch oven). A recipe that is cooked on high setting will take about half as long. But remember, that's only an estimate, so leave yourself a little extra time.
Although the math is pretty straightforward, I thought that some of you might appreciate a quick cheat sheet, so I created one based upon Kathleen Purvis’ suggestions:
| SLOW COOKER | DUTCH OVEN |
|---|---|
12 hours/Low |
3 hours/325° F |
10 hours/Low |
2 1/2 hours/325° F |
8 hours/Low |
2 hours/325° F |
6 hours/Low |
1 1/2 hours/325° F |
5 hours/Low |
1 hour, 15 min./325° F |
4 hours/Low |
1 hour/325° F |
4 hours/High |
2 hours/325° F |
3 hours/Low |
45 min./325° F |
3 hours/High |
1 1/2 hours/325° F |
2 hours/Low |
30 min./325° F |
2 hours/High |
1 hour/325° F |
1 hour/Low |
15 min./325° F |
1 hour/High |
30 min./325° F |