


Bacon Cooked in a Cast Iron Skillet
December/29/2011 08:03 PM Filed in: Miscellaneous
The perfect breakfast to me includes bacon cooked in a cast iron skillet, and I pretty much have that treat at least several times a week. To me, bacon tastes the best in cast iron, and I’ve discovered a couple of tricks to make the bacon come out perfectly every time.
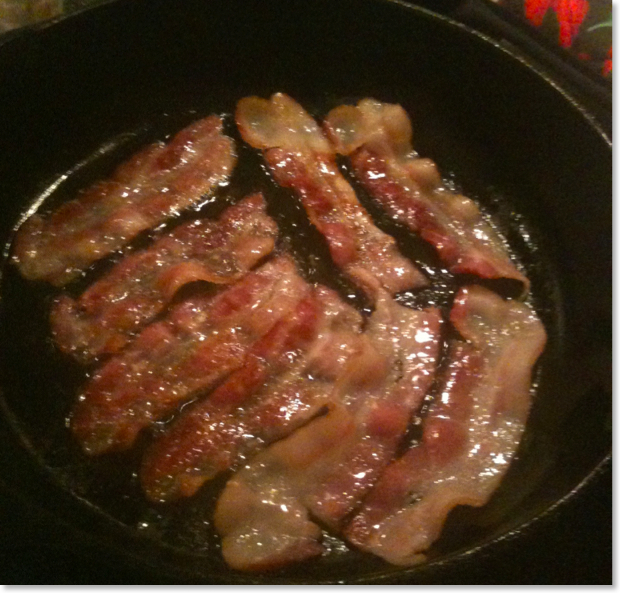
Tip #1: Cut the slices of bacon in half. My mom taught me this trick. She, like I, sometimes became frustrated when bacon slices curled on the ends and as a result cooked unevenly. A friend of Mom’s told her about cutting the bacon slices in two to make them lie flatter in the skillet. Well, it works like a charm! The bacon cooks more quickly and more evenly than full slices.

Tip #2: Use a cast iron press. My husband taught me this trick. I must admit that I don’t use the press as often as he does (frankly I forget), but it certainly makes the bacon lay flat and cook evenly. Even when following Tip #1 above, an occasional slice will curl slightly, depending on the brand. That’s where the cast iron press comes in handy. Rick uses the press on sausage patties, too.
Cast iron pictured above:
Feel free to leave your thoughts in the comments below, or you can contact Kathy directly at kathy@cookingincastiron.com.

Tip #1: Cut the slices of bacon in half. My mom taught me this trick. She, like I, sometimes became frustrated when bacon slices curled on the ends and as a result cooked unevenly. A friend of Mom’s told her about cutting the bacon slices in two to make them lie flatter in the skillet. Well, it works like a charm! The bacon cooks more quickly and more evenly than full slices.
Tip #2: Use a cast iron press. My husband taught me this trick. I must admit that I don’t use the press as often as he does (frankly I forget), but it certainly makes the bacon lay flat and cook evenly. Even when following Tip #1 above, an occasional slice will curl slightly, depending on the brand. That’s where the cast iron press comes in handy. Rick uses the press on sausage patties, too.
Cast iron pictured above:
Feel free to leave your thoughts in the comments below, or you can contact Kathy directly at kathy@cookingincastiron.com.
|
Sausage & Asparagus Risotto
April/21/2011 12:07 PM Filed in: Recipes
Posted by Kathy Mansfield

My husband and I are fans of Gordon Ramsay’s “Hell’s Kitchen.” Truth be told, the drama and yelling attract me more than any food on the show, but I noticed that risotto was a staple in every single menu served on the show. I didn’t really know what risotto was, much less how to prepare it, so when I came across a sausage and asparagus risotto recipe in a Kroger circular I decided to try it. I’ve modified the recipe slightly and created a low sodium version (since my world now involves doctor-mandated low salt foods). Both versions ended up tasting wonderful, although I would encourage folks to try the “real” version first to get the full experience, especially if you have never tried risotto.
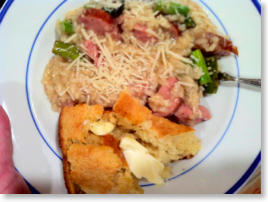
My big “a-ha” was that Arborio rice is made specifically for risotto recipes. Make certain to get this specialty rice so that the risotto turns out the way it should. A trick that seemed to work out well for me was to cook the asparagus in the same skillet that I had browned the sausage. This gave the asparagus a really good flavor, and I had trouble not snacking on the asparagus before it went into the risotto! The original recipe called for 1/2 cup of fresh mushrooms, but I doubled the amount the first time I made it and tripled it the second time, although you could certainly adjust the amount of any of the vegetables to suit your taste.
I used our Lodge 12-inch Pro-Logic skillet, which was the perfect size for the risotto. The sloping sides of this piece of cast iron made the stirring go smoothly—a bonus since the recipe calls for 20 minutes of constant stirring! I used a slanted wooden spatula (pictured), normally used for woks, although any wooden spoon would do.
I loved this recipe so much that I made it twice in three days! Rick definitely liked the regular version the best, but I must admit that the low sodium was more to my liking. Thanks to Gordon Ramsay and “Hell’s Kitchen,” I’m now “in-the-know” about risotto!
 Sausage and Asparagus Risotto
(low sodium options in red)
Cast Iron Required:
12” skillet
Ingredients
Cut sausage into ½ inch cubes; set aside. Bring broth to a boil in a saucepan. Reduce heat to low.
Heat oil in a 12-inch Pro-Lodgic skillet over medium-high heat. Add sausage, onion and mushrooms. Cook, stirring frequently, until sausage is browned.
Add butter and rice. Cook, stirring constantly, 2 minutes. Stir in wine; cook until liquid is almost completely absorbed.
Stir in ½ cup of heated chicken broth. Cook, stirring constantly until liquid is absorbed. Add remaining broth, ½ cup at a time, stirring constantly until each portion of broth is absorbed (about 20 minutes total).
Remove from heat; stir in asparagus and ½ of the Parmesan. Sprinkle top with remaining cheese.
Serves 6
 MacGourmet users, click image to download recipe (or simply drag image to your MacGourmet recipe box).
Feel free to leave your thoughts in the comments below, or you can contact Kathy directly at kathy@cookingincastiron.com.
My husband and I are fans of Gordon Ramsay’s “Hell’s Kitchen.” Truth be told, the drama and yelling attract me more than any food on the show, but I noticed that risotto was a staple in every single menu served on the show. I didn’t really know what risotto was, much less how to prepare it, so when I came across a sausage and asparagus risotto recipe in a Kroger circular I decided to try it. I’ve modified the recipe slightly and created a low sodium version (since my world now involves doctor-mandated low salt foods). Both versions ended up tasting wonderful, although I would encourage folks to try the “real” version first to get the full experience, especially if you have never tried risotto.
My big “a-ha” was that Arborio rice is made specifically for risotto recipes. Make certain to get this specialty rice so that the risotto turns out the way it should. A trick that seemed to work out well for me was to cook the asparagus in the same skillet that I had browned the sausage. This gave the asparagus a really good flavor, and I had trouble not snacking on the asparagus before it went into the risotto! The original recipe called for 1/2 cup of fresh mushrooms, but I doubled the amount the first time I made it and tripled it the second time, although you could certainly adjust the amount of any of the vegetables to suit your taste.
I used our Lodge 12-inch Pro-Logic skillet, which was the perfect size for the risotto. The sloping sides of this piece of cast iron made the stirring go smoothly—a bonus since the recipe calls for 20 minutes of constant stirring! I used a slanted wooden spatula (pictured), normally used for woks, although any wooden spoon would do.
I loved this recipe so much that I made it twice in three days! Rick definitely liked the regular version the best, but I must admit that the low sodium was more to my liking. Thanks to Gordon Ramsay and “Hell’s Kitchen,” I’m now “in-the-know” about risotto!
(low sodium options in red)
Cast Iron Required:
12” skillet
Ingredients
- 1 lb. smoked sausage (or half a pound of sausage)
- 4 cups chicken broth (4 tsp. sodium free chicken bouillon w/ 4 cups water)
- 1 Tbsp. olive oil
- 1 onion, chopped
- 1 1/2 cups mushrooms, sliced
- 2 Tbsp. butter (unsalted butter)
- 1 cup Arborio rice
- 1/2 cup dry white wine
- 2 cups sliced asparagus, cooked crisp-tender
- 1/2 cup shredded Parmesan cheese, divided (no cheese)
Cut sausage into ½ inch cubes; set aside. Bring broth to a boil in a saucepan. Reduce heat to low.
Heat oil in a 12-inch Pro-Lodgic skillet over medium-high heat. Add sausage, onion and mushrooms. Cook, stirring frequently, until sausage is browned.
Add butter and rice. Cook, stirring constantly, 2 minutes. Stir in wine; cook until liquid is almost completely absorbed.
Stir in ½ cup of heated chicken broth. Cook, stirring constantly until liquid is absorbed. Add remaining broth, ½ cup at a time, stirring constantly until each portion of broth is absorbed (about 20 minutes total).
Remove from heat; stir in asparagus and ½ of the Parmesan. Sprinkle top with remaining cheese.
Serves 6
Feel free to leave your thoughts in the comments below, or you can contact Kathy directly at kathy@cookingincastiron.com.
Dutch Oven Brisket
November/25/2010 08:09 PM Filed in: Recipes
Posted by Kathy Mansfield

Cast Iron Required:
Ingredients:
A while back Rick posted information on the Cooking in Cast Iron website about converting cooking times and temperatures from slow cookers to cast iron dutch ovens. He encouraged me to try one of my brisket recipes to test out the conversion chart. Well, my brisket recipe is one of my prized cooking secrets. The recipe was handed down by my mom, and it produces the most tender brisket ever. The brisket cooks slowly (8 hours) in a low temperature oven (225) wrapped in foil. Mmmmm good. I wasn’t sure I was ready to alter those winning steps. So, I figured I would try my second best brisket recipe—this one from one of our slow cooker cookbooks.
I picked up a brisket at the grocery store last week and put it in the freezer, not knowing when I might try the oven version of this slow cooker success story. When Rick had to work late last night, I decided to try my experiment. I grabbed the slow cooker cookbook and quickly found the “Brisket in Ale” recipe I had used before. Unfortunately, I didn’t have some of the main ingredients. So, off to the pantry I went in search of substitutes. I was bound and determined to see if these conversion numbers were really accurate.
 I began the process by preheating the oven to 325. Based on the conversion chart, this was the temperature to use if the slow cooker recipe called for 10 hours at a low setting, except in a dutch oven the brisket should be done after just 2 1/2 hours. I must admit I was pretty skeptical. I placed our new dutch oven trivet in the bottom of the 5 quart dutch oven and laid the 2 pound brisket on top, fatty side down. Next I added the hodge podge of ingredients I was able to gather together from around the kitchen: one large shallot, chopped; 1 teaspoon black pepper, 1 teaspoon of thyme, and 1/2 teaspoon of salt sprinkled on top of the brisket; 1 can cream of mushroom soup mixed with 8 oz. of Sherry cooking wine spread on top. I put the lid on and put the brisket in the oven and set the timer for 2 1/2 hours.
I must admit that I had my doubts about the brisket being even close to done after that short amount of time. So, when the timer went off, I didn’t event check under the lid. I left everything in for another 30 minutes just to be sure.
 Was the brisket going to be cooked through? Even if it was cooked all the way, would it be tender? Would the miscellaneous ingredients I added to the mix be tasty? I should have never doubted. I raised the lid and smelled the delicious aroma of brisket and gravy. One touch with a fork let me know the meat was just as tender as the slow cooking technique I had used for years. And the taste? Let’s just say that I’ve written down all of those cobbled together ingredients so that I can make this recipe again!
Feel free to leave your thoughts in the comments below, or you can contact Kathy directly at kathy@cookingincastiron.com.
Cast Iron Required:
- 5 quart dutch oven (kitchen, not outdoor)
- cast iron trivet
Ingredients:
- 2-3 pound flat brisket
- 2 shallots, sliced thin
- 1 tsp. black pepper
- 1/2 tsp. salt
- 1 tsp. thyme
- 1 can cream of mushroom soup
- 8 oz. Sherry
A while back Rick posted information on the Cooking in Cast Iron website about converting cooking times and temperatures from slow cookers to cast iron dutch ovens. He encouraged me to try one of my brisket recipes to test out the conversion chart. Well, my brisket recipe is one of my prized cooking secrets. The recipe was handed down by my mom, and it produces the most tender brisket ever. The brisket cooks slowly (8 hours) in a low temperature oven (225) wrapped in foil. Mmmmm good. I wasn’t sure I was ready to alter those winning steps. So, I figured I would try my second best brisket recipe—this one from one of our slow cooker cookbooks.
I picked up a brisket at the grocery store last week and put it in the freezer, not knowing when I might try the oven version of this slow cooker success story. When Rick had to work late last night, I decided to try my experiment. I grabbed the slow cooker cookbook and quickly found the “Brisket in Ale” recipe I had used before. Unfortunately, I didn’t have some of the main ingredients. So, off to the pantry I went in search of substitutes. I was bound and determined to see if these conversion numbers were really accurate.
I must admit that I had my doubts about the brisket being even close to done after that short amount of time. So, when the timer went off, I didn’t event check under the lid. I left everything in for another 30 minutes just to be sure.
Feel free to leave your thoughts in the comments below, or you can contact Kathy directly at kathy@cookingincastiron.com.
Recent Cast Iron Acquisitions
August/08/2010 03:44 PM Filed in: Miscellaneous
Posted by Rick Mansfield

Last month, Kathy and I took a day trip to Tennessee, and while we were in Sevierville made the required stop for any cast iron aficionado at the Lodge Cast Iron Outlet Store. This is the second time we had been to a Lodge outlet store, with the previous visit made to the store in South Pittsburg, where Lodge is headquartered. If you’re into cast iron like us (and if you’re reading this, you probably are), you know that visiting one of these stores is akin to a religious experience.
 Lodge has four factory stores, and of the two we’ve visited so far, the Sevierville store was clearly the nicer one. It was larger than the South Pittsburg location and had high ceilings and lots of bare wood walls and displays. It almost felt like being in a log cabin, but it was brighter and more open than your average cabin. It was a thrill to walk into a store dedicated to cast iron and see shopping carts. I immediately grabbed one, although we did not have a clear plan for what we were going to purchase.
As we went along, spending about an hour in the store, Kathy and I walked up and down every aisle, making certain we had missed nothing. We called a family member as well as a friend of the family asking them if they needed us to get them anything while we were there. They both enthusiastically gave us their “orders.” Some of the items we picked up were novelties such as a Lodge baseball cap. It’s black with the Lodge logo on the front and the words “1896 * USA” on the back. I also got one of those rust eraser sticks I’d heard about, but have not had a chance to use. I’ve got a couple of old cast iron chicken fryers that need cleaning up. I’ll be certain to write about my results with the eraser when I’ve had a chance to try it out.
 I was especially excited to find the cast iron casserole dish pictured to the left. To my knowledge, these are not sold on the Lodge website, although Lodge sells an enameled version of the same pan. This one, however, is non-enameled, bare cast iron (although pre-seasoned). A few months ago, I featured the larger enameled cast iron broaster pan in one of my posts, but this smaller cast iron casserole dish was something I’d been wanting for a long time.
 Also pictured here is a cabbage casserole which was the first recipe we tried in the new cast iron casserole pan. I plan on featuring this recipe a few months from now as we get closer to New Year’s, but if you can’t wait until then, be certain to shoot me an email requesting it.
I’d also been wanting a lid for our cast iron wok for quite a while. I realize you may be thinking that a lid is not customarily used with a wok, and I’d have to agree with you completely. But let me explain why I wanted one.
 When Kathy and I cook dinner using our Lodge cast iron wok (see my original review here), we usually cook enough food for our dinner and then have enough food for leftover lunch the next day. You have to realize that this is not customarily the way woks are used. Most of the time a wok will be used to cook just enough food for one meal. So, if there are four people eating, the food in the wok will be divvied out among them with none leftover. But Kathy and I regularly need to make enough food so that we can take our lunch to work with us.
 So, if we pack our lunches right away, we run the risk of our food for that night’s meal getting cold. But if we leave the food in the wok, it tends to lose too much moisture while we’re eating. Therefore, I needed a lid!
A few months back, I emailed customer service at Lodge asking them if they made a lid for the wok. They do not, which didn’t surprise me. However, I was told that the 14” camping dutch oven lid fits perfectly. So, while in the store, I found one of these rather large lids and carried it over to a display where a few woks were sitting. I set the lid on top of the wok, and I was delighted to see that it fits perfectly! It’s almost as if the lid was especially designed for the wok.
 So, our cast iron collection has grown a little bit more. Because we have limited room, I decided long ago that I was not going to collect cast iron simply to collect it, although some people greatly enjoy doing that. Instead, all of our cast iron is what like like to call “in use” cast iron. We actually do use everything we have. I’ve shown a picture of our cast iron display rack before, but it’s a bit more full since the last photos I posted.
What you see here is almost every piece of cast iron we own. Other than what you see here, I also have my main cast iron skillet that has a permanent place on the stove top. It the first cast iron piece I got back in the nineties. It is a Lodge 10.25" skillet that I received back before they began adding the extra grip handle and before everything came pre-seasoned.
I also have Kathy’s grandmother’s chicken fryers (two) in the back room waiting for me to find the time to clean them up and get them back into normal use. I don’t yet know what brand they are, but I look forward to trying to figure that out. My only other not-pictured cast iron item is a Wagnerware cornstick pan which I will have to take that rust eraser to before I can re-season it and get it back into working order.
Finally, pictured below are a few shots of the same rack above, but slightly enlarged so that you can see some of the items we have. I’m not showing these items to show off. I know of many cast iron collectors whose inventories are larger than ours. However, I also know that true cast iron aficionados enjoy looking at other folks’ cast iron. So, enjoy and feel free to post any questions or comments in the comment selection of this post.


Feel free to leave your thoughts or ask questions in the comments below, or you can contact Rick directly at rick@cookingincastiron.com.
Last month, Kathy and I took a day trip to Tennessee, and while we were in Sevierville made the required stop for any cast iron aficionado at the Lodge Cast Iron Outlet Store. This is the second time we had been to a Lodge outlet store, with the previous visit made to the store in South Pittsburg, where Lodge is headquartered. If you’re into cast iron like us (and if you’re reading this, you probably are), you know that visiting one of these stores is akin to a religious experience.
As we went along, spending about an hour in the store, Kathy and I walked up and down every aisle, making certain we had missed nothing. We called a family member as well as a friend of the family asking them if they needed us to get them anything while we were there. They both enthusiastically gave us their “orders.” Some of the items we picked up were novelties such as a Lodge baseball cap. It’s black with the Lodge logo on the front and the words “1896 * USA” on the back. I also got one of those rust eraser sticks I’d heard about, but have not had a chance to use. I’ve got a couple of old cast iron chicken fryers that need cleaning up. I’ll be certain to write about my results with the eraser when I’ve had a chance to try it out.
I’d also been wanting a lid for our cast iron wok for quite a while. I realize you may be thinking that a lid is not customarily used with a wok, and I’d have to agree with you completely. But let me explain why I wanted one.
A few months back, I emailed customer service at Lodge asking them if they made a lid for the wok. They do not, which didn’t surprise me. However, I was told that the 14” camping dutch oven lid fits perfectly. So, while in the store, I found one of these rather large lids and carried it over to a display where a few woks were sitting. I set the lid on top of the wok, and I was delighted to see that it fits perfectly! It’s almost as if the lid was especially designed for the wok.
What you see here is almost every piece of cast iron we own. Other than what you see here, I also have my main cast iron skillet that has a permanent place on the stove top. It the first cast iron piece I got back in the nineties. It is a Lodge 10.25" skillet that I received back before they began adding the extra grip handle and before everything came pre-seasoned.
I also have Kathy’s grandmother’s chicken fryers (two) in the back room waiting for me to find the time to clean them up and get them back into normal use. I don’t yet know what brand they are, but I look forward to trying to figure that out. My only other not-pictured cast iron item is a Wagnerware cornstick pan which I will have to take that rust eraser to before I can re-season it and get it back into working order.
Finally, pictured below are a few shots of the same rack above, but slightly enlarged so that you can see some of the items we have. I’m not showing these items to show off. I know of many cast iron collectors whose inventories are larger than ours. However, I also know that true cast iron aficionados enjoy looking at other folks’ cast iron. So, enjoy and feel free to post any questions or comments in the comment selection of this post.
Feel free to leave your thoughts or ask questions in the comments below, or you can contact Rick directly at rick@cookingincastiron.com.
Queenie's Peach Cobbler/Looking at the World through Cast Iron Lenses
July/12/2010 08:13 PM Filed in: Recipes | Reflections
Posted by Rick Mansfield
 Do you look at the world through cast iron lenses?
That is, when you go to a restaurant or perhaps to dinner at a friend’s house, do you think when the food is served, “You know, I bet this would taste even better if it were cooked in cast iron”?
I admit I do this. In fact, when I make old family recipes, I chuck the directions to use a glass dish, and I usually cook in cast iron instead. You think that green bean casserole is good in a Pyrex dish? You’ve not had green bean casserole until you’ve had it cooked in cast iron. If skillet fries taste best in cast iron, think of how good your uncle’s hash brown casserole will taste. I’ve got two cast iron pans specifically for casseroles, but if you don’t, a cast iron skillet will work just as well.
My cast ironobsession preference makes me re-read all those great family recipes that I ate growing up and rethink them using cast iron. One of those recipes that I applied to cast iron recently was my grandmother’s peach cobbler. You might remember a while back when I posted her cornbread recipe, “Queenie’s Cornbread,” and if you liked that, wait until you try her peach cobbler.
Of course, I should point out that I never actually ate this peach cobbler at my grandmothers house when she was alive. But my mother made it regularly and always referred to it as her “Mom’s Peach Cobbler.” In the copy of the recipe I received, which had the title just mentioned at the top of the page, the directions simply called for a “casserole” dish. But this goes back to my previously mentioned point—I was certain this would go better in cast iron!
In fact, the recipe itself isn’t all that different from the cobblers we’ve made while camping, using a dutch oven placed directly on top of live coals. One of the best features of those great campout cobblers is the crust that forms in the cast iron. Therefore, I was fairly certain that I could (forgive me for saying this!) improve on my grandmother’s recipe.
At our church, my Sunday school class has a potluck brunch every first Sunday of the month. So two weeks ago, I decided to make my grandmother’s peach cobbler, but not in a glass dish, but in cast iron! Now, my wife, Kathy, who doesn’t like peaches (odd, isn’t she?), asked if I’d also make one using apples instead. The recipe is pretty versatile, so the picture at the beginning of this post has apple on the left and peach on the right. To make the cobbler even more special, I made the original peach recipe specifically in my grandmother’s skillet that was handed down to me years ago. It is a BS&R and is at least 70 years old if not older. I used my Lodge skillet that I got in the nineties for the apple cobbler.
Needless to say, both cobblers were a hit, but the peach cobbler was completely gone when the apple cobbler was only half eaten. But by the end of our class, both pans were empty. Cast iron is definitely superior to the standard casserole dish for this recipe as you probably imagine. I encourage you to join me in looking at your world through cast iron lenses!
So, here is Queenie’s recipe for peach cobbler. It’s very easy, so very basic and so very good. Enjoy!
 Cast Iron Required:
10.25" Cast Iron Skillet
Ingredients:
Melt a stick of butter in a cast iron skilet.
Mix a cup of sugar, a cup of flour, 1/4 teaspoon salt, two teaspoons of baking powder, 1 cup whole milk.
Pour in 10.25" cast iron skillet and add one large can of sliced peaches (don’t drain).
Bake at 350° 30-40 minutes.
MacGourmet users, click image to download recipe (or simply drag image to your MacGourmet recipe box).
Rick plans to post more of his grandmother’s recipes in the future, so check back often. Feel free to leave your thoughts or ask questions in the comments below, or you can contact Rick directly at rick@cookingincastiron.com.
That is, when you go to a restaurant or perhaps to dinner at a friend’s house, do you think when the food is served, “You know, I bet this would taste even better if it were cooked in cast iron”?
I admit I do this. In fact, when I make old family recipes, I chuck the directions to use a glass dish, and I usually cook in cast iron instead. You think that green bean casserole is good in a Pyrex dish? You’ve not had green bean casserole until you’ve had it cooked in cast iron. If skillet fries taste best in cast iron, think of how good your uncle’s hash brown casserole will taste. I’ve got two cast iron pans specifically for casseroles, but if you don’t, a cast iron skillet will work just as well.
My cast iron
Of course, I should point out that I never actually ate this peach cobbler at my grandmothers house when she was alive. But my mother made it regularly and always referred to it as her “Mom’s Peach Cobbler.” In the copy of the recipe I received, which had the title just mentioned at the top of the page, the directions simply called for a “casserole” dish. But this goes back to my previously mentioned point—I was certain this would go better in cast iron!
In fact, the recipe itself isn’t all that different from the cobblers we’ve made while camping, using a dutch oven placed directly on top of live coals. One of the best features of those great campout cobblers is the crust that forms in the cast iron. Therefore, I was fairly certain that I could (forgive me for saying this!) improve on my grandmother’s recipe.
At our church, my Sunday school class has a potluck brunch every first Sunday of the month. So two weeks ago, I decided to make my grandmother’s peach cobbler, but not in a glass dish, but in cast iron! Now, my wife, Kathy, who doesn’t like peaches (odd, isn’t she?), asked if I’d also make one using apples instead. The recipe is pretty versatile, so the picture at the beginning of this post has apple on the left and peach on the right. To make the cobbler even more special, I made the original peach recipe specifically in my grandmother’s skillet that was handed down to me years ago. It is a BS&R and is at least 70 years old if not older. I used my Lodge skillet that I got in the nineties for the apple cobbler.
Needless to say, both cobblers were a hit, but the peach cobbler was completely gone when the apple cobbler was only half eaten. But by the end of our class, both pans were empty. Cast iron is definitely superior to the standard casserole dish for this recipe as you probably imagine. I encourage you to join me in looking at your world through cast iron lenses!
So, here is Queenie’s recipe for peach cobbler. It’s very easy, so very basic and so very good. Enjoy!
Queenie’s Peach Cobbler
10.25" Cast Iron Skillet
Ingredients:
- 1 stick butter
- 1 cup of sugar
- 1 cup of flour
- 1/4 teaspoon of salt
- 2 teaspoons of baking powder
- 1 cup whole milk
- 1 can of sliced peaches, don't drain
Melt a stick of butter in a cast iron skilet.
Mix a cup of sugar, a cup of flour, 1/4 teaspoon salt, two teaspoons of baking powder, 1 cup whole milk.
Pour in 10.25" cast iron skillet and add one large can of sliced peaches (don’t drain).
Bake at 350° 30-40 minutes.
Rick plans to post more of his grandmother’s recipes in the future, so check back often. Feel free to leave your thoughts or ask questions in the comments below, or you can contact Rick directly at rick@cookingincastiron.com.